Welcome to XLSX+ Editor – a powerful spreadsheet tool designed for efficient data management, analysis, and reporting. This guide covers the essential features to get you started quickly.
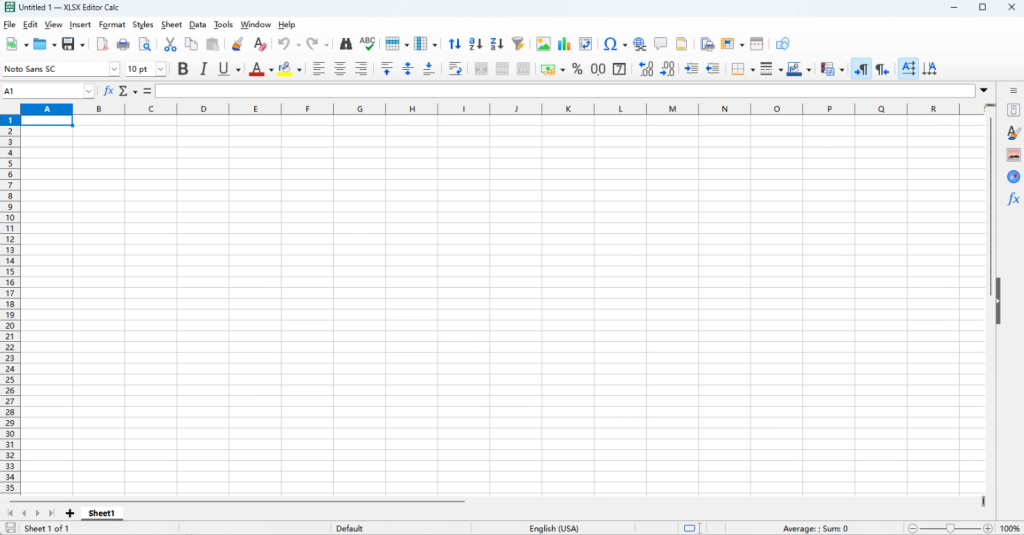
1. Interface Overview
Main Window Layout
| Area | Description |
|---|---|
| Title Bar | Shows the current file name and the program name. |
| Menu Bar | Contains File, Edit, View, Insert, Format, Data, Tools, and more. |
| Toolbar | Quick icons for New, Open, Save, Undo, Redo, Sum, Sort, etc. |
| Formula Bar | Displays the content or formula of the active cell; you can also enter/edit here. |
| Spreadsheet Grid | Rows (1, 2, 3…) and columns (A, B, C…) where you enter data. |
| Sheet Tabs | At the bottom – switch between sheets (Sheet1, Sheet2…). Rename, add, or delete sheets here. |
| Status Bar | Shows Ready, quick statistics (Sum, Average, Count), and view buttons. |
2. Workbook and Sheet Basics
New, Open, and Save
- New:
File>New>Spreadsheetor pressCtrl+N. - Open:
File>OpenorCtrl+O– supports.xlsx,.xls,.ods, and other formats. - Save:
File>Save/Save AsorCtrl+S. Default format is.xlsxfor broad compatibility.
Sheet Management
- Rename: Double‑click a sheet tab, type the new name, and press Enter.
- Add/Delete: Click the
+icon next to tabs to add a sheet; right‑click a tab and chooseDelete Sheet. - Move/Copy: Drag a tab to reorder, or right‑click and select
Move/Copyto another workbook.
3. Working with Cells
Selecting Cells
- Click any cell to select it; typing replaces the existing content.
- Drag to select a contiguous range (e.g.,
A1:C10). - Hold
Ctrlwhile clicking to select multiple non‑adjacent ranges.
Entering and Editing Data
- Enter: Select a cell, type text, numbers, or dates, and press Enter to confirm.
- Edit: Double‑click the cell or select it and edit in the Formula Bar.
- Clear: Press
Deleteto clear content only; pressBackspaceto enter edit mode and delete characters.
AutoFill (Quick Fill)
- Select a cell or range that contains a starting value (e.g., a number, date, or text pattern).
- Drag the small black square at the bottom‑right corner of the selection down or across to fill a series (sequential numbers, dates, months, etc.).
4. Formatting Data
Cell Formatting (Font, Alignment, Borders, Background)
- Select cells, then go to
Format>Cells(or right‑click and chooseFormat Cells). - In the dialog, you can set:
- Numbers: Currency, percentage, date, text, etc.
- Font: Typeface, size, bold/italic, color.
- Alignment: Horizontal/vertical alignment, text wrapping, merging cells.
- Borders: Inner/outer borders and line styles.
- Background: Fill color for cells.
Merge and Center
- Select multiple cells and click the Merge & Center button on the toolbar (or
Format>Merge Cells).
Adjust Row/Column Size
- Drag the dividers between row numbers or column letters manually.
- Double‑click a divider to auto‑fit the row/column to its content.
5. Formulas and Functions – Basics
Formula Rules
- All formulas start with an equals sign (
=). - Operators:
+(add),-(subtract),*(multiply),/(divide),^(power). - Cell references: use
A1,B2, etc. Supports relative (A1), absolute ($A$1), and mixed references.
Common Functions
Click the Function Wizard button (fx) next to the Formula Bar to search and insert functions. Here are the most frequently used ones:
| Function | Purpose | Example |
|---|---|---|
SUM | Sum of a range | =SUM(A1:A10) |
AVERAGE | Average of values | =AVERAGE(B1:B10) |
MAX / MIN | Maximum / Minimum | =MAX(C1:C10) |
COUNT | Count numbers | =COUNT(D1:D10) |
COUNTA | Count non‑empty cells | =COUNTA(E1:E10) |
IF | Conditional logic | =IF(A1>60,"Pass","Fail") |
VLOOKUP | Vertical lookup | =VLOOKUP(lookup_value, range, col_index, 0) |
Quick Sum
- Select a range of numbers and click the Sum icon (Σ) on the toolbar. XLSX+ Editor will automatically create a
SUMformula at the bottom or right of the selection.
6. Sorting and Filtering Data
Sorting
- Select your data range (including headers if any).
- Go to
Data>Sort. - Choose the column to sort by, and select Ascending (A→Z) or Descending (Z→A).
- You can add multiple sort levels (e.g., first by Column A, then by Column B).
AutoFilter
- Select the data range and click
Data>AutoFilter. - Drop‑down arrows appear on each column header. Use them to filter by text, numbers, or colours, showing only rows that meet your criteria.
Advanced Filter (Remove Duplicates)
- Use
Data>More Filters>Advanced Filterto apply complex conditions or extract unique values.
7. Creating Charts
Insert a Chart
- Select the data range you want to visualise (include row/column labels if needed).
- Click
Insert>Chart. - Choose a chart type (Column, Line, Pie, Bar, Scatter, etc.).
- Follow the wizard to set data range, series, titles, axis labels, etc.
- Click
Finish– the chart is embedded in your sheet.
Editing a Chart
- Double‑click the chart to enter edit mode, where you can change type, data range, colours, fonts, legend, etc.
- Right‑click individual chart elements (title, legend, axis) for quick formatting options.
8. Page Setup and Printing
Page Layout
- Go to
Format>Pageto set paper size (A4, Letter, etc.), margins, and orientation (Portrait/Landscape). - Use
View>Page Break Previewto see and manually adjust page breaks.
Print Area and Repeat Headers
- Set Print Area: Select the range you want to print, then
Format>Print Area>Set. - Repeat Headers: In
Format>Page>Sheettab, set “Repeat rows” or “Repeat columns” so that headers appear on every printed page.
- Click
File>Print(orCtrl+P), preview your document, and send to your printer.
9. Data Protection and Sharing
Protect a Sheet
- Go to
Tools>Protect Document>Protect Sheet. Set a password to restrict editing, formatting, and other actions. - To allow editing in certain cells, first unlock them: select those cells, right‑click >
Format Cells>Protectiontab, and uncheck “Locked”. Then protect the sheet.
Protect Workbook Structure
- Use
Tools>Protect Document>Protect Workbookto prevent others from adding, deleting, or renaming sheets.
10. Import and Export
Import Data
- Supports CSV, text files, databases, etc.
- Go to
Insert>Import from Fileor useData>From Text/CSV. - During import, choose the delimiter (comma, tab, etc.) and encoding (e.g., UTF‑8).
Export to Other Formats
- Use
File>Save Asto export as PDF, CSV, HTML, ODS, and many other formats for sharing or publishing.
11. Quick Reference – Keyboard Shortcuts
| Action | Shortcut |
|---|---|
| New Workbook | Ctrl + N |
| Open File | Ctrl + O |
| Save | Ctrl + S |
| Undo | Ctrl + Z |
| Redo | Ctrl + Y |
| Cut | Ctrl + X |
| Copy | Ctrl + C |
| Paste | Ctrl + V |
| Select All (current sheet) | Ctrl + A |
| Find / Replace | Ctrl + F / Ctrl + H |
| Insert Current Date | Ctrl + ; |
| Insert Current Time | Ctrl + Shift + ; |
| Edit Active Cell | F2 |
| Recalculate All Formulas | F9 |
12. Source Code
XLSX+ Editor is a modern, easy-to-use, open source productivity suite for word processing, spreadsheets, presentations and more. And it based on LibreOffice which is distributed under the MPL V2.0 license.