Welcome to PPTX+ Editor – a powerful presentation tool designed for creating, editing, and delivering professional slideshows. Whether you are preparing a business pitch, academic lecture, or creative portfolio, this guide covers the essential features to help you get started quickly.
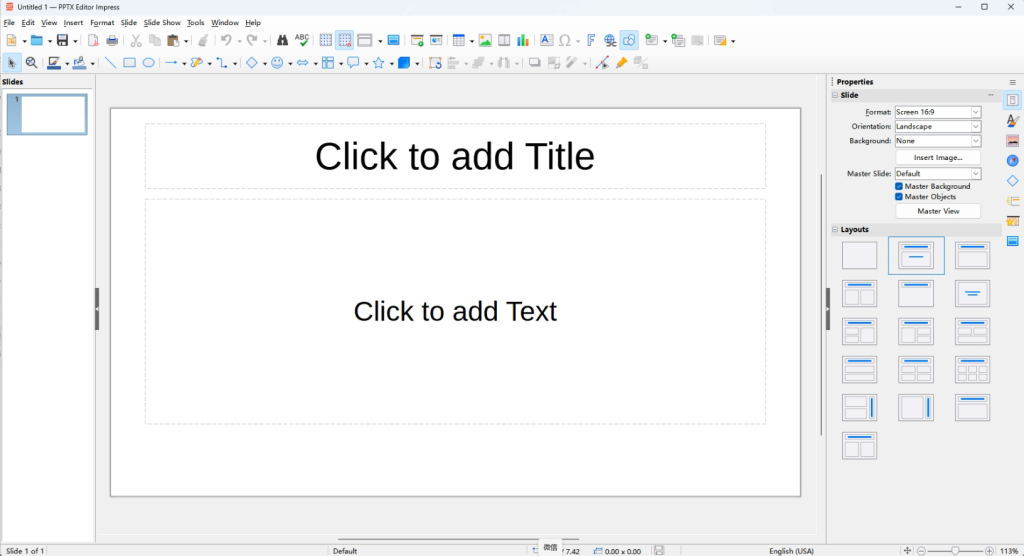
1. Starting Up and Interface Overview
Launch PPTX+ Editor
- Double‑click the PPTX+ Editor icon on your desktop.
- Or select it from the Start menu / Applications list.
Main Window Layout
| Area | Description |
|---|---|
| Title Bar | Displays the current presentation name and the program name. |
| Menu Bar | Contains File, Edit, View, Insert, Format, Tools, Slide Show, and more. |
| Toolbar | Quick access icons for New, Open, Save, Undo, Redo, Cut, Copy, Paste, etc. |
| Sidebar (right) | Contains the Slides Pane (thumbnails of all slides) and the Properties panel for formatting. |
| Slide Workspace | The main editing area where you design each slide. |
| Notes Pane | Below the workspace – add speaker notes for each slide. |
| Status Bar | Shows slide number, slide count, zoom level, and view buttons. |
2. Presentation Basics
New, Open, and Save
- New:
File>New>Presentationor pressCtrl+N. - Open:
File>OpenorCtrl+O– supports.pptx,.ppt,.odp, and many other formats. - Save:
File>Save/Save AsorCtrl+S. The default format is.pptxfor maximum compatibility with other presentation software.
Presentation Views
- Normal View (default): Shows slides, notes, and outline together – ideal for editing.
- Slide Sorter View: Displays all slides as thumbnails – great for reordering and organising.
- Notes View: Focuses on the notes pane for editing speaker notes.
- Slide Show View: Full‑screen presentation mode – starts from the current slide.
Switch views via View > the corresponding option, or use the icons on the status bar.
3. Working with Slides
Adding a New Slide
- Click the New Slide button on the toolbar, or use
Insert>Slide. - Choose a slide layout from the sidebar:
- Title Slide (for the opening)
- Title and Content (the most common layout)
- Section Header (for dividing topics)
- Two Content (for side‑by‑side comparison)
- Title Only, Blank, etc.
Deleting a Slide
- In the Slides Pane (thumbnail view), right‑click a slide and select
Delete Slide. - Or select the slide in the workspace and press
Delete.
Duplicating a Slide
- Right‑click a thumbnail and choose
Duplicate Slide, or useInsert>Duplicate Slide.
Reordering Slides
- In Normal View or Slide Sorter View, drag slide thumbnails up or down to rearrange them.
Changing Slide Layout
- Select the slide, then in the Properties panel (or right‑click >
Slide Layout) choose a different layout.
4. Entering and Formatting Text
Adding Text
- Click on any text placeholder (e.g., “Click to add title” or “Click to add text”) and start typing.
- To add a new text box anywhere:
Insert>Text Box, then click and drag on the slide.
Formatting Text
Select the text you want to format and use the toolbar or menu:
| Formatting | Toolbar Icon | Shortcut |
|---|---|---|
| Bold | B | Ctrl+B |
| Italic | I | Ctrl+I |
| Underline | U | Ctrl+U |
| Font Face | Drop‑down list | — |
| Font Size | Drop‑down list | — |
| Font Colour | Colour picker | — |
| Bullets / Numbering | Bullet/Number icons | — |
Paragraph Formatting
- Alignment: Left, Center, Right, Justify – available on the toolbar.
- Line Spacing:
Format>Paragraph>Indents & Spacingtab. - Indentation: Use the ruler’s indent markers, or adjust via the Paragraph dialog.
5. Inserting and Managing Objects
Images and Graphics
Insert>Image>From File– browse for your image file.- Alternatively, drag and drop an image directly onto the slide.
- Once inserted, select the image and use the Properties panel to:
- Resize: Drag the corner handles (hold
Shiftto maintain proportions). - Rotate: Use the rotation handle (green dot above the image).
- Crop: Right‑click >
Crop(or use the Crop tool in the Properties panel). - Wrap / Position: Arrange images in front of or behind text.
Shapes and Diagrams
Insert>Shape– choose from rectangles, circles, arrows, flow‑chart symbols, callouts, etc.- After drawing a shape, you can:
- Fill with colour or gradient.
- Change outline style (colour, thickness, dashed).
- Add text inside by double‑clicking the shape.
- Adjust transparency.
Charts and Graphs
Insert>Chart– choose a chart type (Column, Bar, Pie, Line, etc.).- A sample chart appears with an associated data table. Edit the table to reflect your own numbers.
- Use the Properties panel to customise chart elements: titles, legends, axis labels, colours, and more.
Tables
Insert>Table– choose the number of rows and columns.- After inserting, use the Table Toolbar (or right‑click options) to:
- Merge / split cells.
- Adjust column widths and row heights.
- Apply borders, background colours, and text alignment.
Audio and Video
Insert>Audio or Video– select a media file from your computer.- Media files are embedded and can be set to:
- Play automatically when the slide appears.
- Play on click.
- Loop until stopped.
- Use the Properties panel to control playback options and volume.
6. Slide Transitions
Transitions are animations that occur when moving from one slide to the next.
Applying a Transition
- Select a slide (or multiple slides) in the Slides Pane.
- Click the Transitions tab in the sidebar (or use
Slide Show>Slide Transition). - Choose an effect from the gallery:
- Fade, Dissolve, Push, Wipe, Curtain, Fly In, etc.
- Set additional options:
- Speed: Slow, Medium, Fast.
- Sound: Add an audio effect (optional).
- Advance Slide: Choose
On Mouse ClickorAutomatically After X seconds.
Applying to All Slides
- After setting a transition, click the
Apply to All Slidesbutton (if available) to use the same transition throughout the presentation.
7. Animations
Animations bring individual elements (text, images, shapes) to life within a slide.
Adding an Animation
- Select the object (text box, image, shape, etc.) on the slide.
- Click the Animations tab in the sidebar (or use
Slide Show>Custom Animation). - Click
Add Effectand choose: - Entrance: Object appears (e.g., Fade, Fly In, Zoom).
- Emphasis: Object changes (e.g., Pulse, Spin, Grow/Shrink).
- Exit: Object leaves (e.g., Fade Out, Fly Out).
- Motion Paths: Object moves along a custom path.
Order and Timing
- In the animation list, each effect has a number (1, 2, 3…) indicating order.
- Drag effects up/down to reorder.
- For each effect, set:
- Start: On Click, With Previous, or After Previous.
- Duration: How long the animation lasts.
- Delay: Optional waiting time before the animation starts.
Preview
- Click the
Playbutton (orSlide Show>Preview) to see animations in action without entering full‑screen mode.
8. Slide Master – Consistent Design
The Slide Master allows you to define the design (fonts, colours, backgrounds, logos, placeholders) for all slides at once.
Accessing Slide Master
View>Master>Slide Master.- You will see a tree of master slides on the left:
- The top‑level master (the parent) affects all slides.
- Child masters correspond to specific layouts (Title, Content, etc.).
Customising the Master
- Make changes to the top‑level master to apply globally:
- Insert a logo or background image.
- Set a font theme (Heading font and Body font).
- Choose a colour scheme.
- Adjust the position of default placeholders.
- Close the master view via
View>Normal(or clickClose Master View).
Why Use Slide Master?
- Any change made in the Slide Master automatically updates every slide that uses that master, saving you from editing slides individually.
9. Notes and Handouts
Speaker Notes
- In Normal View, type your speaking points in the Notes Pane below each slide.
- To see notes clearly, switch to Notes View (
View>Notes). - When presenting in Slide Show View, your notes appear on your monitor (if using dual‑screen setup) while the audience sees only the slides.
Printing Handouts
File>Print– under “Print Layout” select:- Handouts (2, 3, 4, 6, or 9 slides per page).
- Notes (prints each slide with its speaker notes below).
- Outline (prints the text outline only).
10. Slide Show – Presenting
Starting the Show
- Press
F5to start from the first slide. - Press
Shift+F5to start from the current slide. - Or click
Slide Show>Start from Beginning/Start from Current Slide.
Navigation During Presentation
- Next slide: Click the mouse, press
Spacebar,Enter, or theRight/Down Arrowkey. - Previous slide: Press
Backspaceor theLeft/Up Arrowkey. - Go to a specific slide: Right‑click >
Go to Slide> select the slide. - Pause the show: Press
S(or.) to pause/resume. - Exit early: Press
Esc.
Pointer and Pen Tools
- During the show, right‑click and choose:
- Pointer: Changes the cursor to a pen, highlighter, or laser pointer to draw on the screen.
- Eraser: Removes drawn marks.
- Hide/Show Cursor: Toggle visibility.
- Annotations are not saved unless you choose to keep them (prompt appears when exiting).
11. Reviewing and Collaboration
Comments
- Select an object or text on a slide.
Insert>Comment(orCtrl+Alt+C).- Type your comment – it appears as a small note icon on the slide.
- Comments can be replied to, edited, or deleted.
Track Changes
Edit>Track Changes>Record.- While tracking is on, edits are marked visually.
- To review:
Edit>Track Changes>Accept or Reject Changes.
Protecting the Presentation
File>Properties>Security– set a password to:- Open the file (read‑only not allowed without password).
- Modify the file (viewing allowed, but changes require password).
12. Find and Replace
- Press
Ctrl+Fto open the Find toolbar. - Press
Ctrl+Hto open the full Find & Replace dialog (Edit>Find & Replace). - Search for text in the entire presentation or just in selected slides.
- Replace text individually or all at once.
13. Exporting and Sharing
Export as PDF
File>Export As>Export as PDF.- Choose options:
- Export all slides or a range.
- Include/exclude notes and handouts.
- Set image quality.
- PDFs are ideal for sharing a read‑only version.
Export as Images
File>Export As>Export as Images.- Each slide will be saved as a separate image file (PNG, JPEG, etc.).
Save in Other Formats
File>Save As– choose from.odp,.ppt(older PowerPoint format),.html,.pdf, and more.
Sharing via Email
File>Send>Email as Attachment(if configured) to attach the presentation directly to a new email.
14. Keyboard Shortcuts – Quick Reference
| Action | Shortcut |
|---|---|
| New Presentation | Ctrl + N |
| Open Presentation | Ctrl + O |
| Save | Ctrl + S |
Ctrl + P | |
| Undo / Redo | Ctrl + Z / Ctrl + Y |
| Cut / Copy / Paste | Ctrl + X / Ctrl + C / Ctrl + V |
| Select All | Ctrl + A |
| Find / Replace | Ctrl + F / Ctrl + H |
| New Slide | Ctrl + M |
| Duplicate Slide | Ctrl + D |
| Bold / Italic / Underline | Ctrl + B / Ctrl + I / Ctrl + U |
| Insert Comment | Ctrl + Alt + C |
| Start Slide Show (from first) | F5 |
| Start Slide Show (from current) | Shift + F5 |
| Next / Previous Slide (in show) | Space / Backspace |
| End Slide Show | Esc |
| Zoom In / Out | Ctrl + Scroll (mouse) |