Welcome to DOCX+ Editor – a powerful word processing tool designed for creating, editing, and formatting documents with ease. Whether you are writing reports, letters, or complex manuscripts, this guide covers the essential features to help you get started quickly.
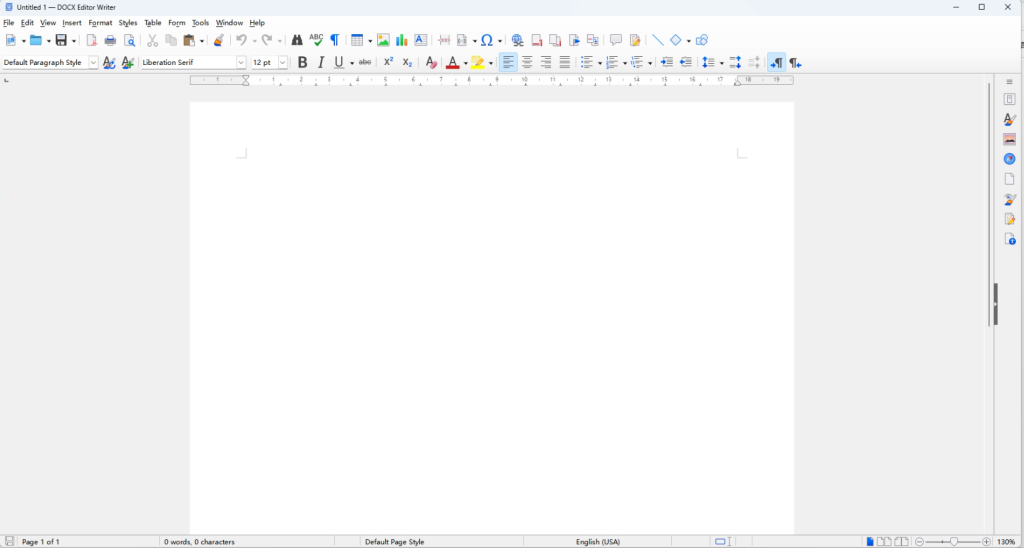
1. Starting Up and Interface Overview
Launch DOCX+ Editor
- Double‑click the DOCX+ Editor icon on your desktop.
- Or select it from the Start menu / Applications list.
Main Window Layout
| Area | Description |
|---|---|
| Title Bar | Displays the current document name and the program name. |
| Menu Bar | Contains File, Edit, View, Insert, Format, Tools, Table, and more. |
| Toolbar | Quick access icons for New, Open, Save, Undo, Redo, Print, Bold, Italic, etc. |
| Ruler | Shows page margins, tab stops, and indentation settings. |
| Document Area | The main workspace where you type and edit your content. |
| Sidebar (optional) | Provides quick access to styles, properties, and navigation. |
| Status Bar | Displays page number, word count, zoom level, and view options. |
2. Document Basics
New, Open, and Save
- New:
File>New>Text Documentor pressCtrl+N. - Open:
File>OpenorCtrl+O– supports.docx,.doc,.odt,.rtf, and many other formats. - Save:
File>Save/Save AsorCtrl+S. The default format is.docxfor maximum compatibility with other office suites.
Document Views
- Print Layout (default): Shows the document as it will appear on paper.
- Web Layout: Optimises the view for online reading.
- Outline: Displays headings and structure for easy navigation.
- Draft: A simplified layout for fast editing without page boundaries.
Switch views via View > the corresponding option, or use the icons on the status bar.
3. Entering and Editing Text
Typing and Navigation
- Click anywhere in the document area and start typing.
- Use the arrow keys,
Page Up/Page Down, orCtrl+Home/Ctrl+Endto navigate quickly. - Insert vs. Overwrite: Press
Insertkey to toggle between insert mode (default) and overwrite mode.
Selecting Text
- Drag the mouse over text to select.
- Triple‑click to select an entire paragraph.
Ctrl+Ato select the entire document.- Hold
Shiftwhile using arrow keys for keyboard selection.
Copy, Cut, Paste
Ctrl+C(Copy),Ctrl+X(Cut),Ctrl+V(Paste).- Paste Special:
Edit>Paste Specialto paste without formatting, as HTML, or as a linked object.
Undo and Redo
Ctrl+Zto undo the last action.Ctrl+YorCtrl+Shift+Zto redo.
4. Formatting Text
Basic Character Formatting
Select the text you want to format, then use the toolbar or menu:
| Formatting | Toolbar Icon | Shortcut |
|---|---|---|
| Bold | B | Ctrl+B |
| Italic | I | Ctrl+I |
| Underline | U | Ctrl+U |
| Font Face | Drop‑down list | — |
| Font Size | Drop‑down list | — |
| Font Colour | Colour picker | — |
| Highlight | Text highlighter icon | — |
Paragraph Formatting
With the insertion point in a paragraph (or with multiple paragraphs selected):
- Alignment: Left (
Ctrl+L), Center (Ctrl+E), Right (Ctrl+R), Justify (Ctrl+J). - Line Spacing:
Format>Paragraph>Indents & Spacingtab – set line spacing (single, 1.5, double, or custom). - Indentation: Use the ruler’s indent markers, or
Format>Paragraph>Indents & Spacingto set left/right indents and first‑line indentation. - Bullets & Numbering: Click the bullet or numbering icon on the toolbar, or use
Format>Bullets and Numbering.
5. Styles – The Key to Consistency
Styles save time and ensure consistent formatting throughout your document.
Applying Styles
- Select the text or place the cursor in a paragraph.
- In the toolbar or sidebar, choose from styles like:
- Default Paragraph Style (Normal text)
- Heading 1, Heading 2, Heading 3 (for sections and subsections)
- Heading (for standalone titles)
- Quotations (for block quotes)
- Preformatted Text (for code snippets)
Modifying a Style
- Right‑click a style in the style list and select
Modify. - Change font, size, colour, alignment, spacing, etc. All text using that style updates automatically.
Creating a New Style
- Format a paragraph exactly as you want.
- Click the style list drop‑down and choose
New Style from Selection. - Give it a name and save it for future use.
6. Working with Lists
Bulleted Lists
- Click the bullet list icon on the toolbar, or use
Format>Bullets and Numbering>Bulletstab. - Press
Enterto continue the list; pressEntertwice or click the icon again to exit.
Numbered Lists
- Click the numbered list icon, or use
Format>Bullets and Numbering>Numberingtab. - Choose from various numbering styles (1, 2, 3 / a, b, c / i, ii, iii, etc.).
- Use the increase/decrease indent buttons on the toolbar to change list hierarchy (sub‑levels).
7. Inserting Objects
Images and Graphics
- Place the cursor where you want the image.
Insert>Image>From File(or drag and drop an image directly into the document).- Once inserted, right‑click the image for options like:
- Wrap: Choose how text flows around the image (Page wrap, Optimal wrap, Through, etc.).
- Anchor: Set whether the image moves with the text or stays fixed on the page.
- Crop / Compress: Adjust or reduce image size.
Tables
Insert>Table> choose rows and columns (or draw a table manually).- After inserting, use the Table Toolbar that appears to:
- Merge / split cells.
- Adjust column width and row height.
- Apply borders and background colours.
- Sort data within the table.
Hyperlinks
- Select text or an image, then
Insert>HyperlinkorCtrl+K. - Enter a web address (URL), a link to a place within the document (bookmark), or a link to another file.
- Click
Applyto create the link.
Page Breaks
- To start a new page, press
Ctrl+Enteror go toInsert>Manual Break>Page Break.
8. Headers, Footers, and Page Numbers
Inserting Headers and Footers
Insert>Header and Footer>Header(orFooter).- A dedicated area appears at the top/bottom of each page. Type your content (e.g., document title, author name, date).
- Click anywhere outside the header/footer area to close and return to the main text.
Adding Page Numbers
- With the header/footer area active, place the cursor where you want the page number.
Insert>Field>Page Number.- Format the number using the regular text formatting tools (font, size, alignment).
- For “Page X of Y”, type “Page ” then insert
Page Numberfield, type “ of ”, then insertPage Countfield.
Different First Page / Odd & Even Pages
- Open the header/footer area, then use the options in the
Header and Footertoolbar to enable: - Different first page
- Different odd and even pages
9. Spelling, Grammar, and Thesaurus
Spell Check
- Misspelled words are underlined in red.
- Right‑click a red‑underlined word for suggested corrections.
- To run a full check:
Tools>Spellingor pressF7.
Grammar and Style Check
- Some versions include grammar checking. Enable/configure it via
Tools>Options>Language Settings>Writing Aids.
Thesaurus
- Select a word, then
Tools>Thesaurusor pressCtrl+F7to find synonyms and antonyms.
AutoCorrect
- Automatically fixes common typos, capitalises sentences, and replaces shortcuts (e.g.,
(c)becomes ©). - Manage AutoCorrect entries via
Tools>AutoCorrect>AutoCorrect Options.
10. Page Layout and Margins
Page Setup
Format>Pageto open the page style dialog.- Page tab: Set paper size (A4, Letter, etc.), orientation (Portrait/Landscape), and margins.
- Background tab: Add a background colour or graphic.
- Header / Footer tabs: Adjust spacing and borders for headers/footers.
Columns
- Select text or place the cursor where you want columns.
Format>Columns– choose the number of columns (2, 3, etc.) and set spacing.- Use the “Entire page” option to apply columns to the whole document, or select “Selected text” for a section.
11. Table of Contents (TOC)
Automatic TOC
- Ensure your headings use the built‑in Heading 1, Heading 2, Heading 3 styles.
- Place the cursor where you want the TOC (usually at the beginning of the document).
Insert>Table of Contents and Index>Table of Contents, Index or Bibliography.- In the dialog, choose the type (
Table of Contents), set how many heading levels to include, and clickOK. - If you update headings later, right‑click the TOC and select
Update Index/Tableto refresh.
12. Comments and Track Changes (Review)
Inserting Comments
- Select the text you want to comment on.
Insert>Comment(orCtrl+Alt+C).- Type your note in the margin. Comments are visible to other reviewers.
Track Changes
Edit>Track Changes>Record.- While tracking is on, every edit (insertions, deletions, formatting changes) is marked visibly.
- To accept or reject changes, use
Edit>Track Changes>Accept or Reject, then navigate through each change.
13. Find and Replace
- Press
Ctrl+Fto open the Find toolbar at the bottom. - Press
Ctrl+Hto open the full Find & Replace dialog (orEdit>Find & Replace). - You can:
- Search for text, formatting, or special characters (paragraph marks, tabs, etc.).
- Replace occurrences individually or all at once.
- Use wildcards or regular expressions for advanced searches.
14. Printing and Exporting
Print Preview
File>Print Previewto see how your document will appear on paper.
File>PrintorCtrl+P.- Select your printer, number of copies, and page range.
Export as PDF
File>Export As>Export as PDF.- Choose options such as image quality, PDF/A compliance, and which pages to include.
- This is the recommended way to share a read‑only version of your document.
Export to Other Formats
File>Save As– choose from formats like.odt,.rtf,.html,.txt, or.docfor backward compatibility.
15. Keyboard Shortcuts – Quick Reference
| Action | Shortcut |
|---|---|
| New Document | Ctrl + N |
| Open Document | Ctrl + O |
| Save | Ctrl + S |
Ctrl + P | |
| Undo | Ctrl + Z |
| Redo | Ctrl + Y |
| Cut / Copy / Paste | Ctrl + X / Ctrl + C / Ctrl + V |
| Select All | Ctrl + A |
| Find / Replace | Ctrl + F / Ctrl + H |
| Bold / Italic / Underline | Ctrl + B / Ctrl + I / Ctrl + U |
| Left / Center / Right / Justify | Ctrl + L / Ctrl + E / Ctrl + R / Ctrl + J |
| Increase / Decrease Indent | Ctrl + Shift + Tab / Ctrl + Tab |
| Insert Page Break | Ctrl + Enter |
| Insert Comment | Ctrl + Alt + C |
| Spell Check | F7 |
| Thesaurus | Ctrl + F7 |
| Go to Page | Ctrl + Shift + F5 |