Welcome to Vector Diagram – a professional vector graphics editor for creating diagrams, flowcharts, technical illustrations, posters, and more. This guide covers the essential features to help you get started quickly.
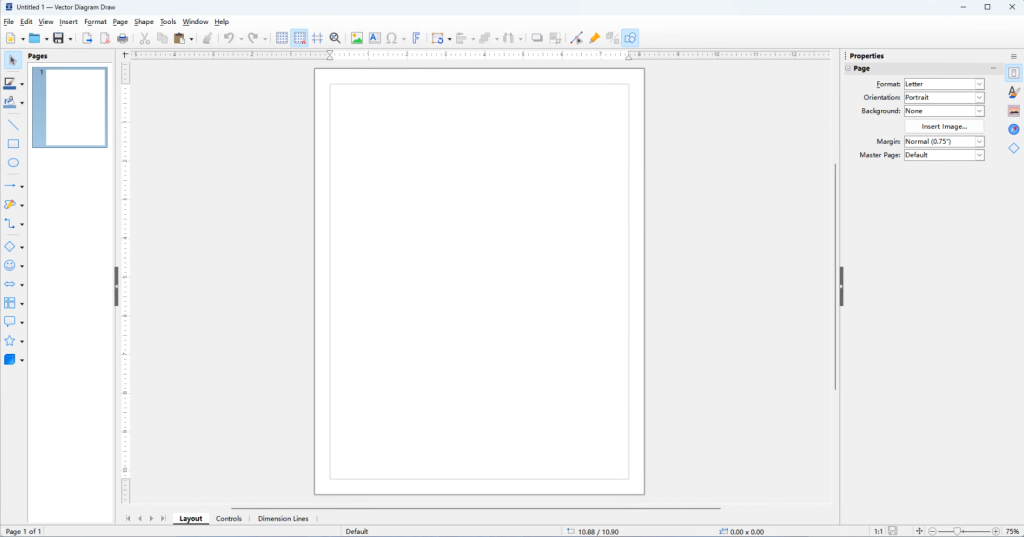
1. Starting Up and Interface Overview
Launch Vector Diagram
- Double‑click the Vector Diagram icon on your desktop.
- Or select it from the Start menu / Applications list.
Main Window Layout
| Area | Description |
|---|---|
| Title Bar | Displays the current document name and the program name. |
| Menu Bar | Contains File, Edit, View, Insert, Format, Tools, Shape, and more. |
| Toolbar | Quick access icons for New, Open, Save, Undo, Redo, Cut, Copy, Paste, etc. |
| Drawing Area | The main workspace where you create and arrange objects. |
| Sidebar (right) | Contains the Page Pane (thumbnail overview), Properties panel (formatting options), and Gallery (pre‑made shapes and symbols). |
| Rulers | Show horizontal and vertical measurements for precise positioning. |
| Status Bar | Displays page number, zoom level, object count, and view options. |
2. Document Basics
New, Open, and Save
- New:
File>New>Drawingor pressCtrl+N. - Open:
File>OpenorCtrl+O– supports.odg(native format),.svg,.vsd(Visio),.dxf,.ai,.eps, and many other vector formats. - Save:
File>Save/Save AsorCtrl+S. The default format is.odg, but you can also save as.svg,.pdf,.png,.jpg, and more.
Document Views
- Normal View (default): Displays your drawing with rulers and guides.
- Master View: Edits the master page (background elements that repeat on all pages).
- Layer View: Shows and manages layers (see Section 8).
Switch views via View > the corresponding option.
3. Working with Pages
Adding a New Page
Insert>Pageor right‑click a page thumbnail in the sidebar and selectNew Page.- You can have multiple pages in one document (useful for multi‑page diagrams or presentations).
Deleting / Duplicating a Page
- Right‑click a page thumbnail and choose
Delete PageorDuplicate Page.
Page Setup (Size and Orientation)
Format>Page– set paper size (A4, Letter, A3, etc.), orientation (Portrait/Landscape), and margins.- You can also define custom page sizes.
4. Basic Drawing Tools
Selecting Objects
- Click the Selection tool (arrow icon) on the toolbar, or press
F1. - Click an object to select it; hold
Shiftto select multiple objects. - Drag a rectangle around objects to select them all.
Drawing Shapes
Select a shape tool from the toolbar, then click and drag on the drawing area:
| Tool | Description |
|---|---|
| Rectangle | Draws rectangles and squares (hold Shift for a perfect square). |
| Ellipse | Draws ellipses and circles (hold Shift for a perfect circle). |
| Line | Draws straight lines. |
| Polygon | Draws closed multi‑sided shapes. Click to add vertices, double‑click to finish. |
| Curve / Bézier | Draws free‑hand curves or precise Bézier paths. |
| Connector | Used for flowcharts – connects shapes with adjustable lines that stay attached when shapes move. |
| Freeform Line | Draws free‑hand lines (like a pencil). |
| Callout | Adds labels with adjustable pointer lines. |
All shapes are vector‑based – they remain sharp when scaled.
Drawing Precise Shapes
- Hold
Ctrlwhile dragging to draw from the centre outward. - Hold
Shiftto constrain proportions (square, circle, 45° angles). - Hold
Altto temporarily ignore snap‑to‑grid.
5. Working with Objects
Moving and Resizing
- Select an object, then drag it to move.
- Drag a corner handle to resize (hold
Shiftto maintain aspect ratio). - Drag the green rotation handle (appears at the top) to rotate the object freely.
Editing Paths (for curves and polygons)
- Select a curve or polygon and double‑click it – you will enter Edit Points mode.
- You can:
- Drag existing points to change the shape.
- Add points by clicking on the path.
- Delete points by selecting and pressing
Delete. - Convert points between sharp and smooth (right‑click >
Convert to Curve/Convert to Line).
Grouping and Ungrouping
- Select multiple objects, right‑click and choose
Group(orCtrl+Shift+G) to treat them as one unit. - To edit individual parts, select the group and use
Ungroup(Ctrl+Alt+Shift+G).
Duplicating
- Select an object and press
Ctrl+Dto duplicate it in place, then drag to the new location. - Or use
Edit>Duplicatefor multiple copies with offset options.
6. Formatting Objects
Select an object and use the Properties panel (or right‑click > Format) to adjust:
Fill (Interior)
- Colour: Solid, gradient, hatching, or bitmap pattern.
- Transparency: Set a percentage to make objects see‑through.
Line (Outline)
- Colour and Width (thickness).
- Style: Solid, dashed, dotted, or custom patterns.
- Arrowheads: Add arrows to the start/end of lines (for connectors and lines).
Shadow
- Enable shadow, set colour, offset, and blur radius.
Position and Size
- Enter exact X/Y coordinates, width, and height for precise placement.
7. Adding and Formatting Text
Inserting Text
- Click the Text tool (letter “A” icon) on the toolbar.
- Click on the drawing area to create a text box, then start typing.
- Alternatively, double‑click any shape to add text inside it.
Formatting Text
Select the text (or text box) and use:
- Font, Size, Bold/Italic/Underline – from the toolbar or
Format>Character. - Paragraph alignment – left, center, right, justified.
- Text direction – horizontal or vertical (useful for labels).
Text Along a Path
- Draw a line or curve, then select both the path and the text.
Format>Text>Fit Text to Path– the text will follow the curve.
8. Layers – Organising Your Drawing
Layers help you separate different parts of your drawing (e.g., background, main objects, annotation).
Managing Layers
View>Layeror click the Layer tab in the sidebar.- Add Layer: Click the
+icon and name it. - Delete / Rename: Right‑click a layer.
- Visibility: Toggle the eye icon to show/hide a layer.
- Lock: Prevent objects on that layer from being edited or selected.
Moving Objects Between Layers
- Select an object, right‑click >
Arrange>Assign to Layer, then choose the target layer.
Layer Order
- Layers are drawn from bottom to top – the topmost layer appears in front.
- Drag layers up/down in the sidebar to reorder them.
9. Align, Distribute, and Order
Aligning Objects
- Select multiple objects.
Shape>Align(or use the toolbar alignment icons):- Align left, right, top, bottom, or centre horizontally/vertically.
Distributing Evenly
- Select three or more objects.
Shape>Distribution– evenly space them horizontally or vertically.
Z‑Order (Front/Back)
- Select an object, right‑click >
Arrange:- Bring to Front / Send to Back
- Bring Forward / Send Backward (one step at a time)
10. Grid, Guides, and Snapping
Grid
View>Gridto show/hide the grid.Tools>Options>Gridto adjust grid spacing and subdivision.
Guides
- Drag from the rulers (top/left) onto the drawing area to create guide lines.
- Use guides to align objects precisely.
View>Guidesto show/hide them, orView>Snap to Guidesto enable snapping.
Snapping
View>Snap to Grid/Snap to Guides/Snap to Object Borders– helps objects align automatically.
11. Connectors and Flowcharts
Using Connectors
- Select the Connector tool from the toolbar.
- Click on the first shape (a connection point will appear), then drag to the second shape – the connector line remains attached even if you move the shapes.
Glue Points
- Objects have default connection points (small blue crosses).
- To add custom glue points:
Insert>Glue Point(or use the dedicated tool) – click on an object to place a new connection point.
Flowchart Symbols
- The Gallery (sidebar) provides pre‑drawn flowchart shapes – drag and drop them onto your drawing.
12. Inserting External Content
Images (Raster Graphics)
Insert>Image>From File– choose a.png,.jpg,.gif, or other bitmap file.- You can crop, resize, and rotate images like any other object.
Spreadsheet Charts
- Copy a chart from a spreadsheet application and paste it into Vector Diagram – it will be embedded as a vector object (if possible).
OLE Objects
Insert>Object– embed other document types (e.g., a text file or spreadsheet) into your drawing.
13. Exporting and Printing
Export as PDF
File>Export As>Export as PDF.- Choose options: export all pages or a range, image compression, and whether to include layers.
Export as Image
File>Export As>Export as Images– save each page as a separate PNG, JPEG, BMP, or GIF.- Vector formats like SVG, EPS, or DXF are also available for compatibility with other design software.
Printing
File>PrintorCtrl+P.- Preview the print output and adjust scaling if needed.
14. Keyboard Shortcuts – Quick Reference
| Action | Shortcut |
|---|---|
| New Drawing | Ctrl + N |
| Open Document | Ctrl + O |
| Save | Ctrl + S |
Ctrl + P | |
| Undo / Redo | Ctrl + Z / Ctrl + Y |
| Cut / Copy / Paste | Ctrl + X / Ctrl + C / Ctrl + V |
| Select All | Ctrl + A |
| Group / Ungroup | Ctrl+Shift+G / Ctrl+Alt+Shift+G |
| Duplicate | Ctrl + D |
| Bring to Front / Send to Back | Ctrl+Shift+F / Ctrl+Shift+B |
| Align Left / Right / Top / Bottom | Ctrl+L / Ctrl+R / Ctrl+T / Ctrl+Shift+B (see menu for all) |
| Start drawing shape | Select tool and drag |
| Constrain proportions (while drawing) | Hold Shift |
| Draw from centre | Hold Ctrl |
| Enter edit‑points mode | Double‑click a curve/polygon |
| Insert Comment | Ctrl+Alt+C |
| Zoom In / Out | Ctrl+Scroll (mouse) |